What causes multifamily building envelope failures? See the climate-driven causes, warning signs, and repair-planning steps for PNW and Utah condo boards.
Your Building Isn't Breaking, It's Talking: What Envelope Failures Are Really Telling You
So, here's a scene where almost every board member and community manager has lived through. Someone on the board walks the property after a storm and spots a brown stain creeping down the stucco or fiber cement near a window. Or a resident calls in about a musty smell in a first-floor unit. Or paint on the trim is bubbling for no obvious reason.
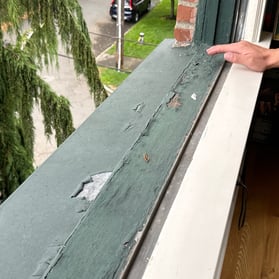
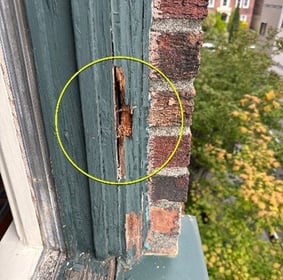
And the instinct is almost always the same: patch it, paint over it, move on. That doesn't look good for anybody, least of all the building.
Here's the thing, those small, cosmetic-looking problems are almost never the actual problem. They're symptoms. The real issue is usually happening behind the wall, out of sight, and it's been building for a while. Like a doctor reading a patient's symptoms, we look at staining, cracking, peeling paint, and leaks as clues pointing to what's actually going on with the building's envelope: the walls, windows, roofing, and waterproofing systems that are supposed to keep water out and the structure dry.
This guide walks through why envelope failures happen, especially here in the Pacific Northwest and Utah, what the warning signs look like, and what a practical repair-planning process actually involves. No scare tactics. Just what we'd tell an owner sitting across the table from us.
Main Causes of Multifamily Building Damage in the Pacific Northwest and Utah
Building envelope performance always comes back to one thing: does water get in, and if it does, can the building dry out before it causes damage? In our region, the climate makes that a much harder question to answer than it is elsewhere.
In Washington and Oregon, we're dealing with long, wet seasons and wind-driven rain that gets pushed sideways into walls, not just straight down onto roofs. Buildings here can go weeks without a real drying window between storms. So even a small gap in flashing or sealant becomes a chronic entry point instead of an occasional one, and moisture gets trapped behind cladding with nowhere to go.
In Utah, the challenge looks different but ends the same place. Hot, dry summers followed by hard winter freezes put stucco, EIFS, fiber cement, and sealants through constant expansion and contraction. That thermal cycling opens up hairline cracks and breaks the bond on sealant joints faster than most owners expect. Add snow load, ice damming, and spring snowmelt, and you've got seasonal water intrusion that's easy to miss until it's already done damage.
Across both regions, we consistently see the same handful of root causes:
- Wind-driven rain finding the weak points: windows, doors, deck ledgers, and any place where two building materials meet are the most common failure points.
- Thermal and freeze-thaw stress: especially in Utah, temperature swings crack stucco and fatigue sealants years before their expected service life is up.
- Poor grading and drainage: when landscaping, concrete, or soil sits against the base of a wall, it wicks moisture up into materials that were never built to handle it. (Or the soil blocks the wall drainage, and water can’t escape the wall system.)
- Trapped moisture with no way to dry: modern wall assemblies are tighter than older ones. That's good for energy efficiency, but it also means water that gets in has fewer paths out.
- UV exposure breaking down roof shingles: sun exposure dries out and embrittles asphalt shingles over time, especially on south- and west-facing slopes. Once shingles start cracking or curling, they lose their ability to shed water, and that opens the door to leaks at the roof deck long before the rest of the envelope shows any signs of trouble.
None of these causes are exotic. They're mechanical and predictable. And here's the important part: they're preventable, whether that means catching them early or designing the building to keep them from happening in the first place.
Signs of Envelope Failure: What to Look For
This is where we tell owners: don't wait for the leak. By the time water is dripping into a unit, the damage behind the wall has usually been happening for months, sometimes years. Here are the four symptom categories we see most often, and what each one is usually telling you.
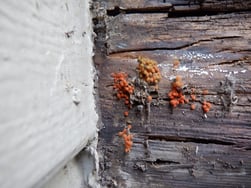
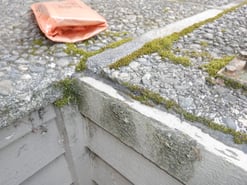
Staining and Growth
Where to look: siding, areas below windows and decks, the base of walls, brick, and exposed concrete.
Moss, dark streaks, and white chalky residue (called efflorescence) on brick or concrete are all signs that moisture is moving through a material it shouldn't be moving through. Staining at the base of a wall often means the wall is in contact with soil or landscaping and wicking up ground moisture. Streaking below windows or rooflines usually traces back to a leak point above it.
"Isn't that just mold from the sprinklers hitting the wall?" Maybe. But the only way to know for sure is to trace it back to the source, and that's exactly the kind of thing a building consultant is trained to run down.
Peeling Paint and Swelling
Where to look: siding, trim around windows and doors, deck areas, and interior surfaces near exterior walls.
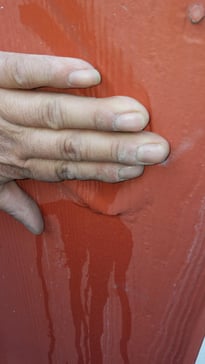
If wood or fiber cement is swelling, it's absorbing water from somewhere close by. Peeling paint is a sign the material underneath is saturated. The paint is literally being pushed off the surface because there's nowhere else for that moisture to go. Swelling specifically near a window is one of the more reliable indicators that the window itself is leaking, not just the surrounding wall.
Leaks and Condensation
Where to look: siding, decks, patios, courtyards, and window glass.
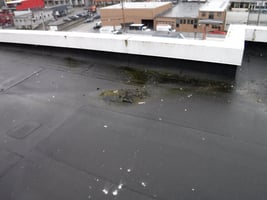
Standing water on a deck or patio usually points to a drainage problem, not just heavy rain. Condensation between window panes means the seal on that window has already failed. Sweating interior walls mean warm, moist indoor air is condensing against a cold surface, usually because insulation or a vapor barrier behind the wall has failed. Icicles or streams of water running down a wall in winter are a sign that water is flowing somewhere it was never designed to go.
Cracks
Where to look: stucco, fiber cement, masonry, drywall, concrete, and sealant joints.
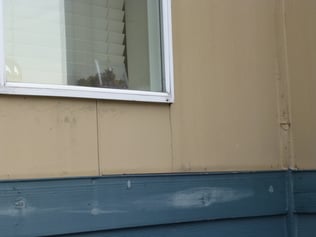
Cracked drywall inside a unit can point to movement or damage in the framing itself. Cracked cladding is one of the clearest signs of water working its way in behind the exterior finish. And cracked or separated sealant is basically an open door for water intrusion. It's one of the easiest things to miss and one of the most important to fix.
One quick note: none of these symptoms tell you the full story on their own. A crack might be cosmetic settling, or it might be sitting right on top of a failed waterproofing detail. That's why the next step matters so much: you don't want to guess.
Practical Repair Planning: A Phase-by-Phase Approach
So once a board or manager has spotted one or more of these warning signs, what's the actual next move? Here's how we walk Owners through it.
Phase 1: Document what you're seeing. Before anything else, get photos and dates on every symptom: staining, cracking, peeling paint, leaks. This isn't busywork. It gives whoever investigates the problem a timeline to work from, and it protects the association if this ever becomes a warranty or insurance conversation.
Phase 2: Get a professional diagnosis, not just a repair quote. This is the step most owners skip, and it's the one that costs the most to skip. A painter can repaint. A handyman can re-caulk. But neither one is trained to trace a stain back through the wall assembly to find the actual entry point. A building envelope consultant looks at the whole system (cladding, flashing, windows, drainage) and figures out root cause before anyone starts cutting into walls. A proper visual exam or wellness check can save months of guesswork and repeat repairs down the line.
Phase 3: Scope and prioritize the repairs. Not every finding needs to be fixed tomorrow. A good scope of work separates urgent, active water-intrusion issues from lower-priority cosmetic or preventive items and gives the board a realistic sequence and budget range to plan around, typically somewhere in the range of a few weeks for solated repairs, or several months for a full envelope remediation project depending on scope.
Phase 4: Loop in your reserve study and budget. Envelope repairs are rarely a surprise line item if the reserve study has been kept current. This is a good moment to check whether envelope maintenance and eventual replacement are actually reflected in the numbers, not just the roof and the boiler.
Phase 5: Repair, then verify. Once work is done, it's worth having the same consultant who diagnosed the problem confirm the repair actually addresses it. That closes the loop and gives the board documentation that the fix was done right, not just done.
The Bottom Line
Water intrusion doesn't announce itself. It shows up as a stain, a crack, a little bit of peeling paint: small stuff that's easy to write off. But those symptoms are the building telling you something, and the earlier that message gets read correctly, the cheaper and less disruptive the fix is going to be.
We're not going to tell you every crack means a crisis. Most of the time, it doesn't. But when boards and managers know what to look for and bring in the right expertise at the right point, they end up making better decisions, and spending association funds on the right repairs instead of the same ones twice.
If your building shows any of these signs, a conversation with J2 is a low-pressure way to get clarity before you commit to a repair plan.